MessageFocus How-To: Keep your Data Clean by Filtering out Inactive Contacts
Filters really are a powerful tool, and a great way to keep your send lists clean, and your campaign reports current and relevant.
Hello there, and welcome to another MessageFocus top tip. This month we’re making the most of the good weather. So, as we throw open the windows and let in the spring air, we can’t help but think of ways to keep our MessageFocus accounts tidy, too.
If a tree falls in the forest, and nobody is around to hear it, does it make a sound? If that tree is consistently unopened email, it absolutely does, by way of lacklustre campaign performance data.
People can unsubscribe if they don’t want to receive future emails, but in many cases they won’t bother, and will just hit ‘delete’ instead. Maybe the contact has moved onto new pastures and isn’t using the email address anymore, or perhaps they’re just not interested in the content.
Whatever their reason, this grey data is clogging up your reporting statistics, and removed of it, things may look a lot fresher! It’s also a drain on your resources to send to these accounts, and one that we can avoid!
Our Filter tool now extends to your Data Lists, allowing you to run filters previously exclusive to campaigns onto the data directly. Using this powerful feature, we can scrutinise and remove any contacts who aren’t opening their emails over a long period of time. This helps keep the scope of your audience more focused, and will help maximise your results.
The filter tool is covered in more detail in our Help Documentation, but here’s a quick run through how to remove anyone who hadn’t opened your email in at least 6 months.
In order to filter your data, first you have to be looking at it! Navigate to your chosen list, and then browse the contacts.
To set up this filter, you need to do the following:
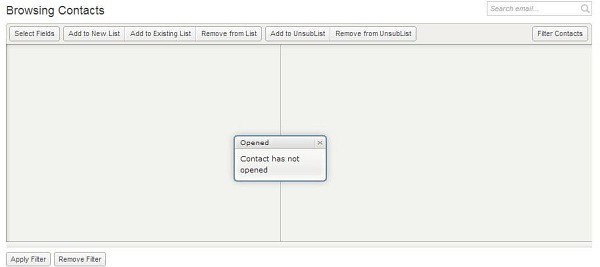
- Set the Rule Category to “˜Event Match’ and the Rule Type as “Opened”, then click “OK”
- As we want to filter people who have not opened their emails, click the “Negate Rule” checkbox.
- Clicking “˜Select Object’ will allow you to specify what it is the person hasn’t read. This can be an entire Workspace, Project, Campaign or even a specific launch. Clicking the triangles next to each tier, you can then display the tier beneath it. Once you’re happy with your selection, click the circular radio button next to the object, then click “Okay.
- Finally we need to specify the date range we want to analyse. In this example, we want to check for an event that’s happened within 6 months. Ignoring the other options, go to “˜Event Start Date’ and set it to “˜”Today’s” Date”’. By default, this will be set to “Today Minus”, which is what we want. In the months column, put in “˜6′, then click “Ok”. The red box containing your new rule should now turn blue. You can now click “Apply Filter”.
If your filter doesn’t turn blue, it means something’s not been applied properly. Our Support Team are on station to assist if you’re unsure what’s missing!
Once the filter has been applied, the system will process your request, and when the page loads again, you will be viewing your filtered results. To remove these filtered records from your list permanently, click “Remove From List”, and select the list in question you want them removed from.
There are plenty of settings in this filter you could tweak to get different results, either more specific or more general, or even dedicated filters that leave your data intact, but send only to a specified audience. Our Help Documentation and videos will show you how to do exactly that, and more. Filters really are a powerful tool, and a great way to keep your send lists clean, and your campaign reports current and relevant.