How to run a fax broadcast with InterFAX
In any fax broadcast, two ingredients are required: (a.) a document to be broadcast, and (b.) a list of recipients.
The sent document can be either (a.) static, which means that every recipient in the list receives exactly the same fax as the others, or (b.) dynamic, which means that every recipient receives a personalized fax which may be different from others, for example, including his name, company, and possibly other details.
There are three ways to go about performing a fax broadcast through InterFAX, depending on your requirements:
- Broadcast a static document, using your email program’s address book. Click here for more.
- Broadcast a static document, using the InterFAX list management interface. Click here for more.
- Broadcast a dynamic document, using the InterFAX Mail Merge Web Fax form. Click here for more.
Fax broadcast a static document, using your email program’s address book
(This example uses Outlook Express screenshots, but can be applied to any standard email application)
Please note: before running ANY fax broadcast, send yourself a one-recipient test to verify that all of your settings are correct.
- 1. Open your address book and create a new group.
- 2. Insert your recipients into this group, making sure that recipient addresses are entered in InterFAX format, like +4461236547@fax.tc. In the following screenshot, the group name is Exporters and the list includes five recipients. Please note that InterFAX can handle lists of up to 7500 recipients per fax broadcast.
- 3. Create a new email message and enter the group name (in this case, Exporters) into the “To:” line. Attach the document you wish to broadcast and click ‘Send’.
- 4. That’s it! Having sent the message as a group, you will NOT receive individual email confirmations for each and every recipient clogging up your Inbox. Instead, InterFAX will send you one, concentrated report at the end of the fax broadcast.
Fax broadcast a static document, using the InterFAX list manager
Please note: before running ANY fax broadcast, send yourself a one-recipient test to verify that all of your settings are correct.
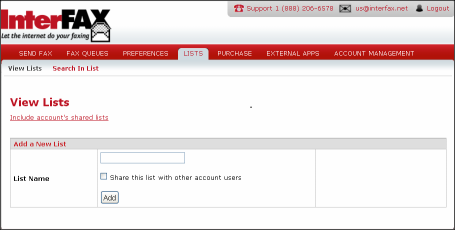
- 1.Login to your InterFAX account and select the Lists tab, then the View Lists sub-menu. If you have not yet created lists, this is what you’ll see:
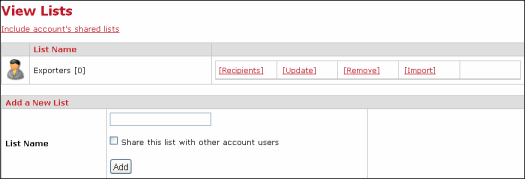
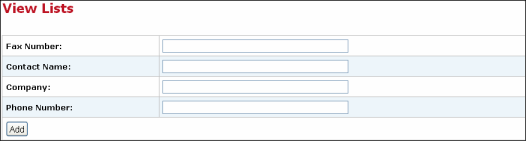
- 2. To create a new list, enter a list name into the text box marked ‘List Name’, and click ‘Add’. After entering Exporters as an example list name, and clicking ‘Add’, the new list shows up in a table:
- 3. There are two methods of populating the list. Recipients can either be added manually, one-by-one, or they can be batch-imported through an import facility.
Option 1 – Adding a recipient manually – Click the Recipients link, then the Addbutton to reach the following dialog, which allows you to enter a recipient:
Option 2 – Importing a list of recipients – Alternatively, click the Import link to reach the following screen:
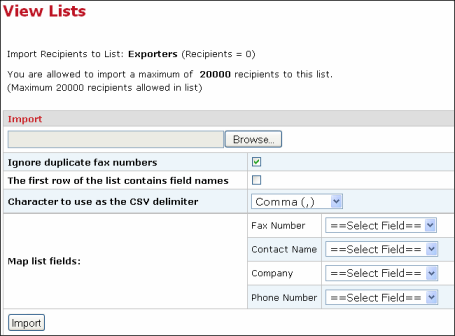
Click the Browse button to find a comma-delimited list of recipients (CSV file) which you have prepared before-hand. This list may contain field names as the first row, in which case you need to select the ‘Mark check box if the first row….’.
The list may contain up to four fields – the recipients’ fax number, name, company, and phone number. Only the fax field is mandatory.
Let InterFAX know which column in your CSV file holds which bit of data by selecting the column location from the four dropdown boxes (options are: Field doesn’t exist, First Field, Second Field, etc.).
Click Import. This will upload your list and display the list of recipients of the list.
- 4. Send the document, which you wish to fax, to the list by addressing your email like list=Exporters@fax.tc, where “Exporters” is an example of a list name. The document will be broadcast to the entire list.
- 5. That’s it! Having sent the message to a list, you will NOT receive individual email confirmations for each and every recipient clogging up your Inbox.
If you wish to view the progress of your fax broadcast, as it is running, login to your InterFAX account, and follow it through the Outbound Queue.
Fax Broadcast a Dynamic Document Using Mail Merge Web Fax Form
Use the InterFAX Mail Merge form to send a personalized document to an InterFAX list.
To send a merge document using the InterFAX Mail Merge Web form, take the following steps:
- 1. Log in to your InterFAX account.
- 2. Click the Send Fax tab and then click Send merge.

- 3. Select an InterFAX list from the Select a list dropdown menu. Managing InterFAX lists
![]()
- 4. Optional: You can attach up to five files by clicking Upload a file to be faxed or drag and drop files to the Attachment field.
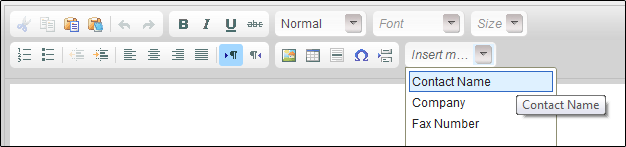
- 5. Add text in the message field. To add merge fields to your fax, click the Insert Merge Fields dropdown menu and select from the available fields in your list.
- 6. If needed, change your default settings by clicking Advanced Options. To learn more about the advanced options, click here.
![]()
- 7. To preview your fax, click the Preview & Send Sample button and scroll between the merge results. You can send the current record as a sample to a specific fax number by inserting a fax number in the Send Sample box and clicking the Send Fax button. When you’re done, click Close Preview.
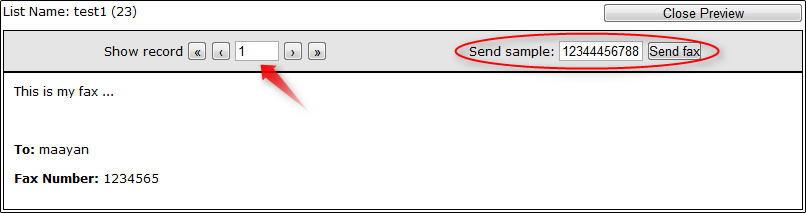
- 8. To send the merge document to the InterFAX list, click Submit.
Set InterFAX to automatically re-purchase prepaid cards
When an InterFAX prepaid card is used up, no further faxes can be sent until a new card is purchased. Attempting to send a fax after depletion of one card and before purchase of another card results in an error condition ‘205000 – Quota Exceeded‘, and faxes are not sent.
In order to avoid this condition, InterFAX may be set up to automatically purchase a prepaid card, using the account’s existing credit card details. Both successful and failed attempts to automatically purchase an additional card are reported to the account email address. A new card is purchased when an earlier card is 95% used.
Log into your account and go to Purchase -> Repeat Orders. You will be presented with the following screen:
Click “Click here to add a repeat order“. The following screen will appear:
Select the size prepaid card you wish to automatically re-purchase every time, and click “Add Repeat Order“. The following screen will appear and indicate the addition of a “repeat order”.
That’s it! From now on, every time you reach 95% usage of your current prepaid card, a new card will automatically be purchased for you.
If you wish to remove a repeat order, simply return to these screens, and click “Remove” on the appropriate line.
How to organize received documents by using shared properties
Each of the documents received or shared with you has several properties: time received, number of pages, shared time, and owner.
You can organize your documents by adding tags, a unique reference, a document name, and shared properties.
Primary Users may add up to 10 shared properties to the account.
To add shared properties to your account:

- 1. Go to PREFERENCES > Account Settings > Shared Properties.
- 2. Type a name for the new property in the ‘Name’ box.
- 3. In the ‘Type’ list, select the type of data for this property: String, Date or Numeric.
- 4. Click the plus icon + to add the property to the list.
To specify a document’s shared properties:
Both a document’s owner and shared users with ‘Edit’ permission can specify the properties in a received or shared document.
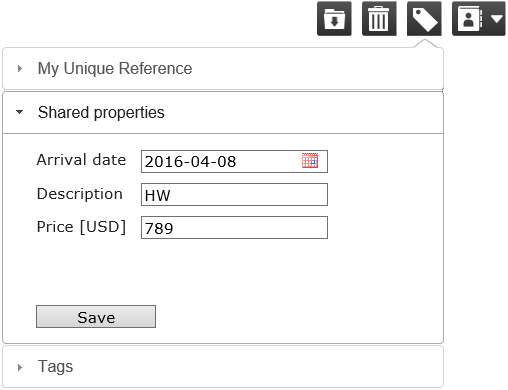
- 1. Open the received or shared document to view in the InterFAX Document Viewer.
- 2. Click Tag As,
- 3. Click Shared properties
- For a Date property, click the Calendar icon and specify a date (for example 2016-05-28.
- For a Numeric property, click the box and type numbers (for example, 12000.34).
- For a String property, click the box and type any character (for example, zxcASD1 23!@#”).
- 4. Click Save.
View values of shared properties of a document
There are three ways to view the shared properties of a document:
- from within the InterFAX Document Viewer
- from the Inbound Queue
- from the document, itself
To view a document’s properties if you are the owner or have ‘Edit’ permission:
- 1. Open the document in the InterFAX Document Viewer.
- 2. Click Tag As.
- 3. Click <strong<Shared properties.
- 4. Review the specified values.
To view a document’s properties from the Inbound Queue:
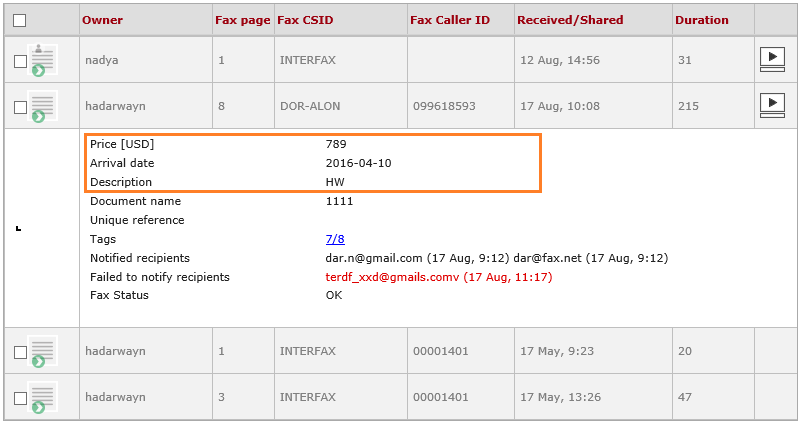
- 1. Log into InterFAX.
- 2. Click FAX QUEUES > Inbound Queue.
- 3. Click any field for the document.
- 4. View the values in the open panel.
- 5. To close the panel, click a field for that document.
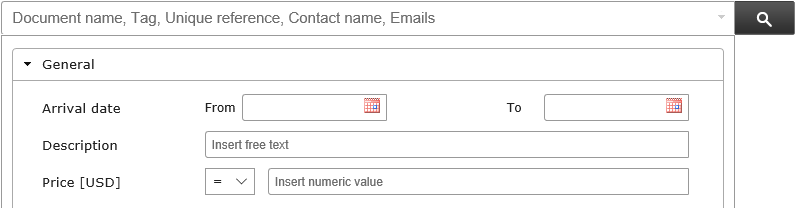
To search for documents in the Inbound Queue (using the shared properties):
All account-defined shared properties appear when you use the Advanced Search feature with the Inbound Queue. Each shared property appears in the Advanced Search panel with its own property format.
- 1. Log into InterFAX.
- 2. Click FAX QUEUES > Inbound Queue.
- 3. Click the arrow next to the Search button.
- 4. In the Advanced Search panel, view all the defined shared properties.
- Searching using a Date property, click the calendar icon and specify a date. (For example, for a Date property with From and To boxes, specify From 2016-05-28 To 2016-08-19.)
- Searching using a Numeric property, select a numeric operator (, =, =) and type a numeric value. (For example, select = and type 7200.5.)
- Searching using a String property, type the text to match. (For example, type London.)
- 5. Click Search.
How to create shared queue
You can use InterFAX’s Auto-Sharing feature to share your received documents with other account users.
Instead of sharing each document manually, with Auto-Sharing, you can share ALL your received documents in just a few steps.
Who can create a shared queue:
Each user may create and change the settings of the auto-sharing.
The auto-share settings applies only on receiving documents (documents which the user is the owner of them).
To share documents automatically:
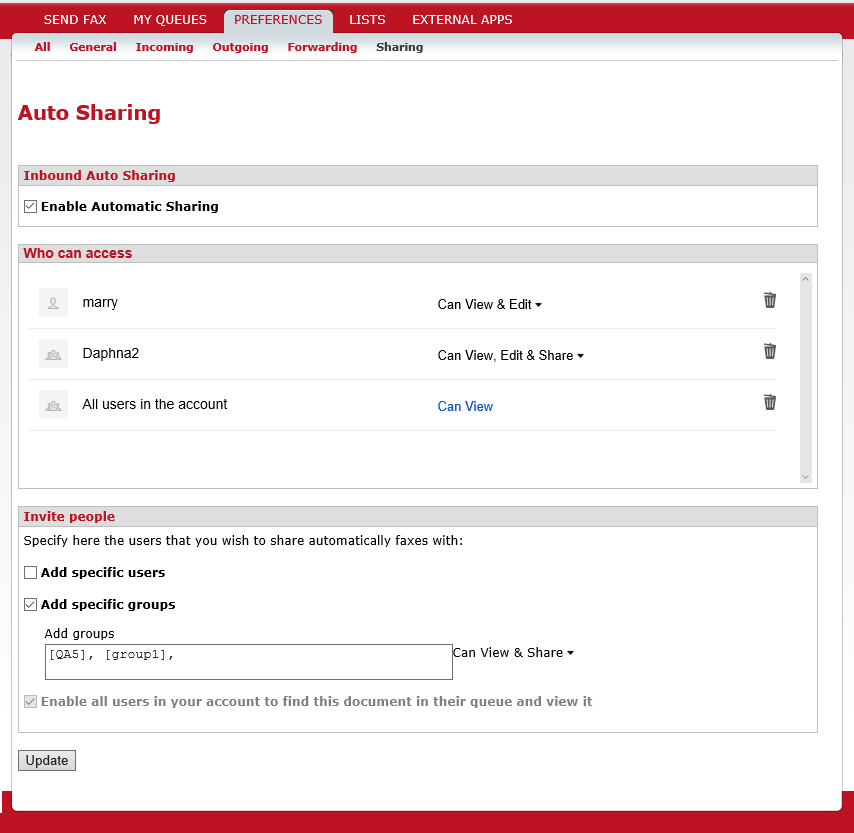
- 1. Click PREFERENCES > Sharing.
- 2. Then select the Enable Automatic Sharing check box.
- 3. In the Invite people section, invite account users (or account groups) to auto-share documents.
To invite specific users, select the Add specific users check box and then type user IDs, email addresses, or contact names in the Add users box. Then select the sharing permission: Can View (default), Can View and Share, Can View and Edit or Can View, Edit and Share.
To share with a group, select the Add specific groups check box and then type group names in the Add groups box.
To invite all users associated with the account to view documents, select the Enable all users in your account to find this document in their queue and view it check box. - 4. Click Update.
Notes:
- To remove shared users or change sharing permission in the Share dialog box: Click Delete, next to that user’s name and click Done.
- To change sharing permission in the Share dialog box: Select a different permission level from the list next to that user’s name and click Done.
- To share documents with groups, you must create the groups before sharing.
How to share documents
With InterFAX you can share documents with other users in the account.
- You can share received documents with specific users, with groups of users, or with all account users.
- You can assign permission for others to view only or to view and edit documents.
- You can notify users with a private message about sharing.
- You can share specific received documents.
- You can share all your received documents automatically by creating a Shared Queue.
For more information about sharing documents, see the following topics:
- How to share a received fax or document
- How to transfer ownership of a received document
- How to create a shared queue, or how to share automatically documents with users and groups
- How to delete a document that was shared with you
- How to hide a document that was shared with you
How to delete a shared document
You can share received documents among all users associated with an account.
If you are the owner of the document, you can delete the received document. This action removes the document from all queues of shared users and deletes the document permanently from the system.
If you have ‘View’ sharing permission for a document, you can only hide the document. Hiding the document only removes the document from your queue. All other users with sharing permission can still see the document in their queues. To see the document again after hiding it, ask the document’s owner to share it with you again.
If you have ‘Edit‘ sharing for a document, you can both delete and hide the document.
To delete a shared document from your queue:
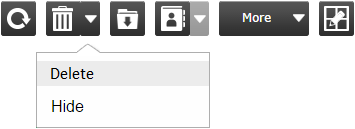
- Select a received, shared document in the Inbound Queue and then click Delete Button > Delete Option, or:
- View a shared document in the InterFAX Document Viewer and click Delete Button > Delete Option.
Notes:
- 1. Only users with ‘Owner’ and ‘Edit’ permissions can delete documents. Users with ‘View’ permission can only hide it.
- 2. After deleting a document, the document will be moved to ‘trash’ until it will be deleted permanently automatically or by the user.
How to share a received document
Sharing a document enables other users to at least view (and possibly edit) that document.
To share a received document:
- 1. In the Inbound Queue, select a document (by selecting the check box for a received or shared document).
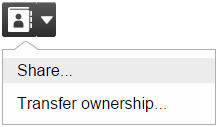
- 2. Click Share . Or, view the document first, by clicking the ‘View document’ icon, and then, in the InterFAX Document Viewer click Share > Share.
-
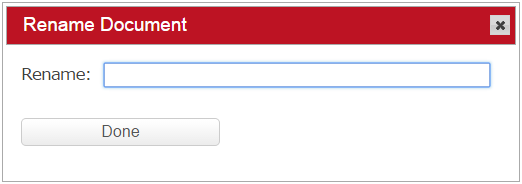
- 3. If the document hasn’t been named, in the Rename Document dialog box, type a name for the document and click Done.

- 4. In the Share dialog box, review the document owner and the sharing details (if any).
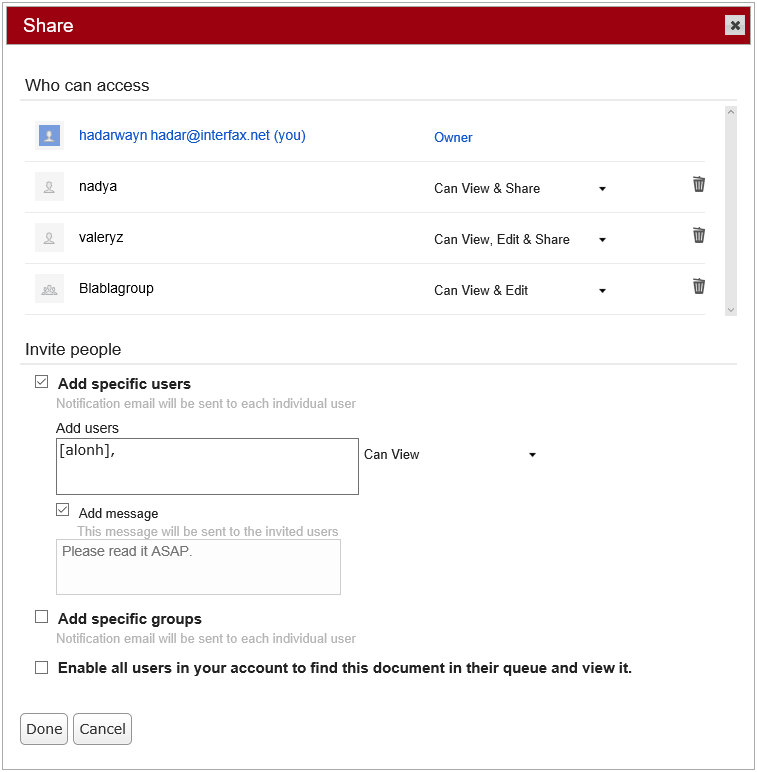
- 5. Invite others to view this document.
- For specific users, select the Add specific users check box and type user IDs, email addresses, or contact names in the Add users box. Then specify the share permissions from the list next to the box: Can View (default), Can View and Share, Can View and Edit or Can View, Edit and Share. If you wish, select the Add message check box and type a message in the box below. InterFAX sends an automatic notification to shared users. If you added a personal message, it goes to each user.
- For an existing group of users, select the Add specific groups check box and type group names in the Add groups box. Then specify the share permissions from the list next to the box: Can View (default), Can View and Share, Can View and Edit or Can View, Edit and Share. If you wish, select the Add message check box and type a message in the box below.
- For inviting all users associated with the account to view the document, select the Enable all users in your account to find this document in their queue and view it check box.
- 6. Click Done.
As the owner of the document, you can remove or change sharing permissions for shared users in the Share dialog box.
To remove shared users or change sharing permission in the Share dialog box:
- Click Delete, next to that user’s name and click Done.
To change sharing permission in the Share dialog box:
- Select a different permission level from the list next to that user’s name and click Done.
How to transfer ownership of a received document
If you are the owner of a shared document, you can transfer that ownership to another user.
To transfer document ownership:
- 1. In the Inbound Queue, select the check box for a received document. (You must be the owner of the document.)
- 2. View the document by clicking the ‘View document’ icon..
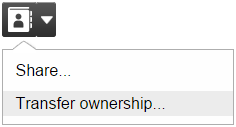
- 3. In the InterFAX Document Viewer click Share > Transfer ownership.
- 4. If the document hasn’t been named before, in the Rename Document dialog box, type a name in the Rename box and click Done.
- 5. In the Transfer ownership dialog box, type the user’s name for the new owner of the document. InterFAX sends an automatic notification to the user.
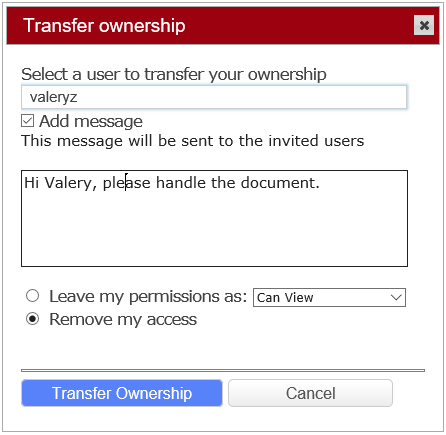
- 6. If you wish, select the Add message check box and type a personal message to send with the transfer message.
- 7. To no longer have access to this document, select Remove my access. To maintain some access select Leave my permissions as: and then select the type of access you want: Can View (default), Can View and Share, Can View and Edit or Can View, Edit and Share.
- 8. Click Transfer Ownership.
How to hide a shared document
You can share received documents among all users associated with an account.
If you are the owner of the document, you can delete the received document. This action removes the document from all queues of shared users and deletes the document permanently from the system.
If you have ‘View’ sharing permission for a document, you can can only hide the document. Hiding the document only removes the document from your queue. All other users with sharing permission can still see the document in their queues. To see the document again after hiding it, ask the document’s owner to share it with you again.
If you have ‘Edit’ sharing for a document, you can both delete and hide the document.
To hide a shared document from your queue:
-
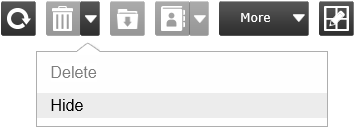
- Select a received, shared document in the Inbound Queue and then click
Delete > Hide
-
- .
-
- View a shared document in the
-
- and click
Delete > Hide
- .
Notes:
- Only shared users can hide documents from their queues. The owner of a document can only delete it permanently.
- After hiding a document from your queue, you cannot use search to find the document because you no longer share the document. To be able to view the document, ask the document owner to share it with you again.
How to view received documents
There are three ways to view regular Inbound documents.
- 1. If you have not activated the Google Docs feature, after InterFAX receives an inbound document, InterFAX sends you an email message with the received document attached.
- 2. If you have activated the Google Docs feature and have specified to view incoming documents through Google Docs, after InterFAX receives an inbound document, InterFAX sends you a notification message with a link to view the document online. Click the link to view the document in Google Docs.
- 3. You can view inbound documents from your Inbound Queue.
To manually view an inbound document:
- 1. In your browser, go to https://cp.interfax.net/ (or to https://secure.interfax.net/ – our former control panel).
- 2. In the login page, type your Username and Password.
- 3. Click Login.
- 4. Click FAX QUEUES > Inbound Queue.
- 5. In the Inbound Queue, next to the document to view, click the Magnifying Glass.
To receive and view PCI DSS compliant faxes, emails, uploads and forms, try our ShieldQ service.
How to activate Google Docs Faxing
Do the following to activate the Google Docs Fax feature:
- 1. Log in to your InterFAX account.
- 2. lick External Apps > Google Docs.
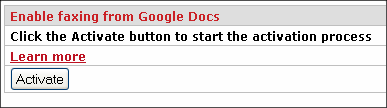
- 3. Click Activate Google Docs to activate the feature. The Google Accounts page appears.
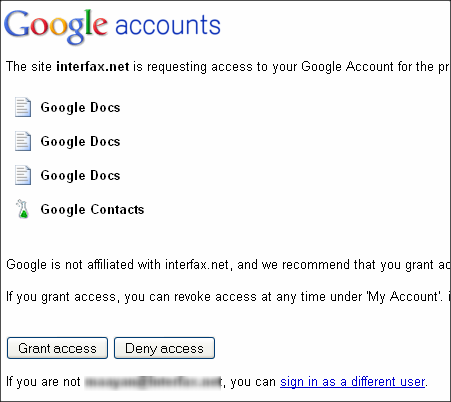
- 4. Click Grant Access to grant InterFAX access to your Google Docs account. The Google Docs status page now appears.
The option Grant Access without revealing your credentials means that you agree to grant InterFAX access to your account without revealing your username and password. You can revoke this option at any time from either your InterFAX or Google account.
- 5. Right click Fax this and select Add to Favorites or Bookmark This Link. Some browsers allow you to drag and drop the link directly to your toolbar or bookmarks folder. You can also change the default settings by clicking the Change button.
Note: You can change the default settings in the Google Docs status page by clicking Change

How to use the Fax Viewer
What types of documents can be viewed
InterFAX’s Fax Viewer can display received faxes.
To receive and view PCI DSS compliant faxes, emails, uploads and forms, try our ShieldQ service.
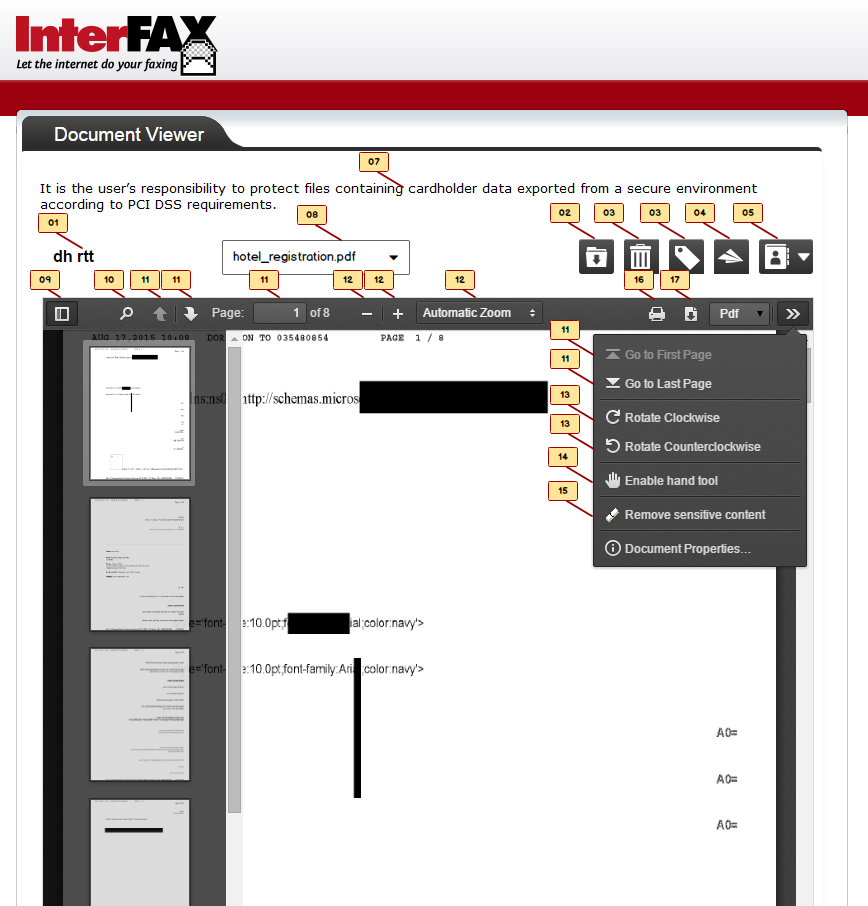
InterFAX Fax Viewer features
(01) Rename
You can add or edit a fax’s name field by clicking its name.
The “Rename the document” popup window will open to edit the fax name.
By default there is no name for the received message and “Untitled” is shown.
Only Owners of a fax and users with “Can view and edit” share permission may rename a fax.
(02) Archive
You can archive a document to hide it from your queue by clicking the Archive icon, and then clicking OK.
Archiving a fax is practically stating that this fax has been handled.
Archiving a fax hides it from the Inbound Queue.
You can use the advanced search for archived faxes to view them or to return them back to the Inbound Queue.
Only Owners of a fax and users with “Can view and edit” share permission may archive a fax.
The general procedure for working with received faxes is:
1- Receive the fax.
2- View the fax.
3- Tag, rename, add a unique reference, or edit shared properties of the fax.
4- Archive the fax.
(03) Delete Options
Delete:
You can delete a fax permanently by clicking the Delete icon, and then clicking OK.
Only Owners of a fax and users with “Can view and edit” share permission to a fax may archive.
Hide:
You can hide a fax from your Inbound Queue by selecting the fax, clicking the Delete icon and selecting the Hide option.
InterFAX does not delete the hidden fax.
When you hide a fax, InterFAX only turns off the share with you.
You cannot search for and find hidden faxes.
Only shared users (with “Can view” or “Can view and edit” share permission may hide their shared faxes.
(04) Tag As Options
Unique Reference:
You can add a unique reference to your document to enhance your searches by clicking the Tag As icon and selecting the My Unique Reference section. Type text for the reference and click Save.
Shared Properties:
If your account’s primary user added shared properties, you can edit them to each received fax for enhanced searches. To edit Shared Properties, click the Tag As icon. Then click the Shared Properties section to edit one or more shared properties.
Tags:
You can add tags to your fax for enhanced searches. To add tags, click the Tag As icon. Then click the Tags section to select one or more existing tags or to create a new tag.
Only Owners of a fax and shared users with “Can view and edit” share permission may edit the Unique Reference, Share properties and Tags.
(05) Forward Fax
You can forward a fax to a fax number by clicking the Forward to Fax icon. You can forward to Fax by two options:
* No cover page
* With cover page
Only users that own Outbound PCI service have this capability.
Primary Users may disable this feature for users with PCI credentials.
(06) Share Options
Share:
You can share the fax with other users by clicking the arrow next to the Share icon and select the Share option. You then can specify which the users can access the fax and assign sharing permissions.
To share a fax, you must rename it before sharing it.
Only Owners of a fax and shared users with “Can share” share permission may share a fax with other users.
Transfer Ownership:
You can transfer your credentials for a fax to another user in your account by clicking the arrow next to the Share icon and select the Transfer Ownership option. Then, specify the user to transfer the ownership to. You may adjust your own permissions to: Can view, Can view and edit, or remove your access to the fax.
To transfer your ownership of a fax, you must first rename the fax.
Only Owners of a fax may transfer ownership of a fax with another user.
(07) PCI Warning
The PCI warning mentioned here: “It is the user’s responsibility to protect files containing cardholder data exported from the secure environment according to PCI DSS requirements” is shown only to users with Inbound PCI service, available via ShieldQ.
(08) Toggle Sidebar
You can click the Toggle Sidebar icon to navigate through a fax by viewing thumbnails of pages and clicking a thumbnail to select it and view the page.
(09) Find in Fax
You can search for text within the open fax. Click the Search icon, type the text, and click the right or left arrow. To have InterFAX indicate all the found items, select Highlight all. By default, InterFAX searches the text without considering the letter case. To search for text with capitalization, select Match case.
The feature applies only with text-type files.
(10) Paging Options
Previous page / Next Page:
If your fax has more than a single page, you can navigate through its content by using the page navigation buttons.
(11) Page number:
You can quickly navigate through a fax by typing a specific page number in the Page box and then pressing Enter.
Go to First Page / Go to Last Page:
To go to the beginning of the fax, click the ‘more options’ icon and then click the Go to First Page option.
To go to the end of the fax, click the ‘more options’ icon and then click the Go to Last Page option.
(12) Zoom
Zoom In, Zoom Out, Automatic Zoom:
You can increase and decrease the magnification by clicking + or -. To specify a magnification, select a zoom option from the list to the right of the + button.
(13) Rotate
You can rotate the page view by clicking the ‘more options’ icon and then clicking Rotate Clockwise or Rotate Counterclockwise.
(14) Hand tool
You can use your computer’s mouse to navigate through a document by clicking the ‘more options’ icon and then clicking the Enable hand tool option.
(15) Remove Sensitive Content tool
This tool enables users to hide sensitive content or private information that are visible in the received fax.
This tool permanently removes visible text and graphics from a fax by “burning” a black box over the selected area.
In order to black out certain areas, zoom in to a sensitive content area, choose the “Remove Sensitive Content” tool in the ‘more options’ button, draw a rectangle above the document, and then confirm the process.
The action is permanent. After “burning” the selected area, the fax cannot be restored.
(16) Print
You can print the selected fax by clicking the Print icon and specifying the print options.
|
Features |
“Owner” |
“Can Edit” |
“Can View” |
Comments |
| View document |
✔* |
✔* |
✔* |
* Determined by the PCI credentials. |
| Delete |
✔ |
✔ |
✘ |
|
| Hide |
✘ |
✔ |
✔ |
|
| Archive |
✔ |
✔ |
✘ |
|
| Share |
✔ |
✔* |
✔* |
* Can share only if also have “Can share” credential. |
| Transfer Ownership |
✔ |
✘ |
✘ |
|
| Rename |
✔ |
✔ |
✘ |
|
| Tag |
✔ |
✔ |
✘ |
|
| Unique reference |
✔ |
✔ |
✘ |
|
| Shared properties |
✔ |
✔ |
✘ |
|
| Forward to fax |
✔* |
✔* |
✔* |
* Only PCI users can forward to fax. |
| Remove Sensitive Content |
✔ |
✔ |
✘ |
(08) File Selection Field
If you opened to view a secure document upload, you may receive multiple files uploaded together.
You can select which file to view, by selecting a file from the list.
The file selection field is displayed only for receiving Uploads.
(09) Toggle Sidebar
You can click the Toggle Sidebar icon to navigate through a document by viewing thumbnails of pages and clicking a thumbnail to select it and view the page.
(10) Find in Document
You can search for text within the open document. Click the Search icon, type the text, and click the right or left arrow. To have InterFAX indicate all the found items, select Highlight all. By default, InterFAX searches the text without considering the case of the letters. To search for text with capitalization, select Match case.
The feature applies only with text-type files.
(11) Paging Options
Previous page / Next Page:
If your document has more than a single page, you can navigate through its content by using the page navigation buttons.
Page number:
You can quickly navigate through a document by typing a specific page number. in the Page box and then pressing Enter.
Go to First Page / Go to Last Page:
To go to the beginning of the document, click the ‘more options’ icon and then click the Go to First Page option.
To go to the end of the document, click the ‘more options’ icon and then click the Go to Last Page option.
(12) Zoom
Zoom In, Zoom Out, Automatic Zoom:
You can increase and decrease the magnification by clicking + or -. To specify a magnification, select a zoom option from the list to the right of the + button.
(13) Rotate
You can rotate the page view by clicking the ‘more options’ icon and then clicking Rotate Clockwise or Rotate Counterclockwise.
(14) Hand tool
You can use your computer’s mouse to navigate through a document by clicking the ‘more options’ icon and then clicking the Enable hand tool option.
(15) Remove Sensitive Content tool
This tool enables users to hide sensitive content or private information that are visible in the received document.
This tool permanently removes visible text and graphics from a document by “burning” a black box over the selected area.
In order to blackout certain area, zoom in to a sensitive content area, choose the “Remove Sensitive Content” tool in the ‘more options’ button, draw a rectangle above the document, and then confirm the process.
The action is permanent. After “burning” the selected area, the document cannot be restored.
(16) Print
You can print the selected document by clicking the Print icon and specifying the print options.
Primary Users may disable this feature for users with PCI credentials.
(17) Download
You can download the document to your computer.
First, specify the download format (PDF, TIFF, or PNG) and then click the Download icon.
Primary Users may disable this feature for users with PCI credentials.
|
Features |
“Owner” |
“Can Edit” |
“Can View” |
Comments |
| View document |
✔* |
✔* |
✔* |
* Determined by the PCI credentials. |
| Delete |
✔ |
✔ |
✘ |
|
| Hide |
✘ |
✔ |
✔ |
|
| Archive |
✔ |
✔ |
✘ |
|
| Share |
✔ |
✔* |
✔* |
* Can share only if also have “Can share” credential. |
| Transfer Ownership |
✔ |
✘ |
✘ |
|
| Rename |
✔ |
✔ |
✘ |
|
| Tag |
✔ |
✔ |
✘ |
|
| Unique reference |
✔ |
✔ |
✘ |
|
| Shared properties |
✔ |
✔ |
✘ |
|
| Forward to fax |
✔* |
✔* |
✔* |
* Only PCI users can forward to fax. |
| Remove Sensitive Content |
✔ |
✔ |
✘ |
How to add a service to a user in a prepaid account
Note: Adding a service is available only to primary users in an account. To add a service to a user in your account, login to your account and go to “Account Management -> Users”. A list of all users in your account is displayed:
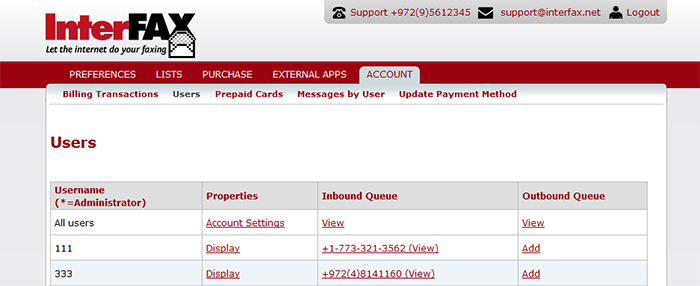
To add inbound service to the above test-admin-user, for example, click on the ‘Add’ link in the ‘Inbound Queue’ column. You will be presented with a choice of countries and area codes in which to set up an inbound number for this user. Once selected, you will be returned to this screen, where the ‘Add’ link will change to ‘In cart’, as in the following image.

Similarly, if you need to add outbound service to the above test-inbound user, click on the ‘Add’ link in the ‘Outbound Queue’ column. You will be presented with a dialog box to enter this user’s email address. Once selected, you will be returned to the user list screen, where the ‘Add’ link will change to ‘In cart’.
Now you need to check out. Click the ‘In cart’ link and follow the screens through the checkout process.