InterFAX and ISO 27001 certification
InterFAX Communications Ltd. is ISO 27001 certified for information security, joining a select list of companies, which includes Xerox, Pfizer, and Vodafone, in having received this accreditation by Certification Europe.
Below are some commonly asked questions regarding ISO 27001 and InterFAX’s certification.
What is ISO 27001 certification?
ISO 27001 is the internationally recognized and respected standard that evaluates if a company is following information security best practices. This completely neutral standard applies an exacting, risk-based approach to determine the security of data in an organization, assessing IT structure, processes, and people.
What did InterFAX need to do to achieve ISO 27001 certification?
InterFAX underwent a rigorous audit of our information security management system, our processes, and our staff, who are trained in information security and data protection.
How difficult is it to get ISO 27001 certification?
It can be difficult, since it requires a three-stage process. If companies meet ISO 27001 standards, they are certified for three years. After that time, they must re-certify.
Can I rely on companies that say they are ISO 27001 certified?
Unfortunately, many companies may say they are ISO 27001 certified, but actually rely on the certification of external data center companies, which of course does not extend to the companies’ own information security management system and staff. Our ISO 27001 certification covers InterFAX’s entire operation. See more by clicking here.
How does ISO 27001 certification benefit me?
Companies who prioritize investment in information security practices and ISO 27001 certification provide you with the assurance that we protect customer data, 24/7.
Additionally,
- It ensures that InterFAX handles data exchange in a safe environment
- It provides the confidence that ISO 27001’s stringent requirements meet PCI DSS Level 1 standards, which we are accredited for, and EU GDPR, which we are compatible with — even though no official certification is required for the latter
- It enables consistent service delivery: no disruptions
- It eliminates the weakest link in data breaches — human error — by building a corporate culture of “security first”
- It manages and minimizes risk exposure
Find out more on our ISO 27001 certification page.
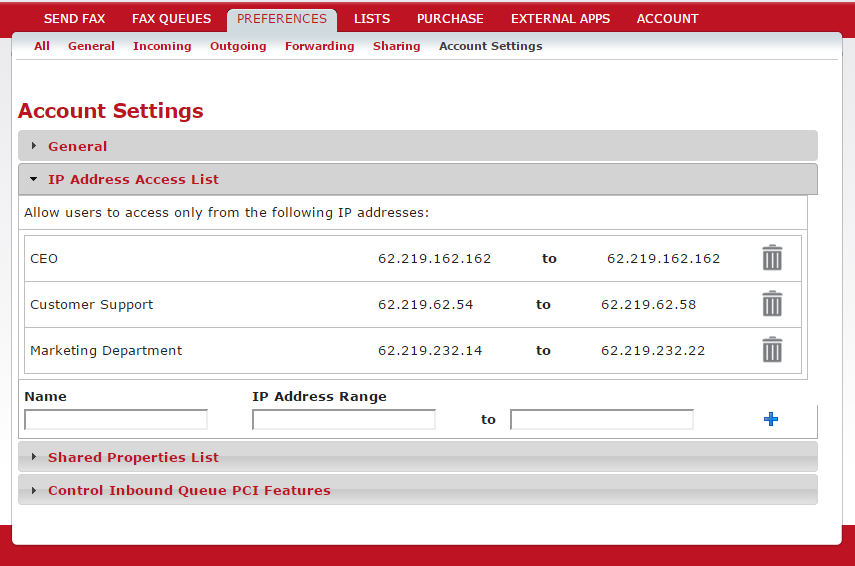
How to restrict account access by IP Address
Primary Users may add IP address ranges to restrict access to the account.
To restrict access by specifying allowed IP addresses:
- 1. Go to PREFERENCES > Account Settings > IP Address Access List.
- 2. InterFAX shows a list of all IP addresses with access restrictions in your account.
- 3. Give an identifier to the access restriction in the ‘Name’ box.
- 4. To allow access from a single IP address, type the same IP address in the ‘IP Address Range’ and the ‘to’ boxes. For example: 62.219.162.162 to 62.219.162.162
- 5. To allow access from a range of IP addresses, type the lower IP address in the ‘IP Address Range’ box and the higher IP address into the ‘to’ box. For example: 62.219.62.54 to 62.219.62.58
- 6. Click the plus icon to add the access restriction.
Notes:
- 1. Restricting access by IP address is available only to Primary users.
- 2. The access restrictions also apply to the InterFAX Web service (API).
- 3. Make sure to allow your OWN IP address first, otherwise you will lock yourself out of your InterFAX account.
How to enhance security when sending faxes through InterFAX (for HIPAA, PCI DSS and other purposes)
InterFAX is compliant with some of the strictest security policies available – HIPAA and PCI DSS. See our PCI DSS compliance statement and our HIPAA compliance statement.
PCI DSS compliance
Some users – such as banks, credit card companies, hotels and others, are required to follow the PCI guidelines in their communications as they are sending credit card data. Customers who require additional security on their account — regardless of the content in their faxes, can use the PCI compliant service as well.
To use our PCI-compliant service requires your users to be set up on a different sub-system at InterFAX. In order to enable PCI compliance for a user, simply contact our team and request to change your user service. Once that is completed, you will need to apply the following measures:
- 1. Stop using email-to-fax – sending credit card data via email is not PCI compliant and you will not be able to use this feature in a PCI user in InterFAX.
- 2. Integrate the PCI endpoint – if you are currently using the InterFAX API, you will need to change the API endpoint to the separate endpoint for the PCI fax API. Note: some of the method names in the PCI fax API are different from the regular API.
HIPAA and other types of compliance
Some users – such as US healthcare entities who are required to abide by HIPAA guidelines, and financial institutions worldwide – have enhanced privacy requirements from messaging providers, such as InterFAX.
While Interfax does not fall into any of the HIPAA “covered entity” categories, as potential Business Associate we have implemented several privacy-enhancing features and procedures, and suggest that you apply the following measures:
- 1. Use TLS or PKI to send your message – We enable TLS-secured communication to our Web Service servers via https://ws.interfax.net, and public-key encryption of email messages, so that potentially patient-identifying information can be submitted securely for faxing.
- 2. Use the ‘delete fax after completion’ feature – This setting may be selected through your account sending preferences. It is intended to keep sensitive information on our servers no longer than is necessary to send a fax or to announce its failure (several minutes). When set, images of faxes sent through the service, as well as temporary files, will immediately be deleted from our servers upon completion.
- 3. Don’t place patient-identifying, or otherwise confidential, information into any data fields – Make sure that confidential information is only present in the body of your outgoing fax. All other parts of a transaction are retained indefinitely for billing purposes, so don’t insert confidential information anywhere except in the fax itself.
Enabling Encryption for Fax Confirmations
InterFAX is a secure fax-to-email service, supporting SSL access, strong encryption and HIPAA compliance. For an introduction to InterFAX’s encryption features, see our encrypted fax solutions.
This page explains how to enable encryption for fax confirmations sent by InterFAX. See also our documentation on encrypting inbound fax messages and encrypting outbound fax messages.
Enabling Encryption for Fax Confirmations Sent by InterFAX
This feature will add another layer of security to your communications with InterFAX. When you send faxes through the InterFAX email-to-fax service, you may choose to receive confirmations. You can select to receive confirmations on success of a transaction, on failure, always, or never.
These confirmations are standard email messages which are returned to the original sender address of the email-to-fax. Normally, these messages are sent in plain, unencrypted format. However, it is possible encrypt these messages. To encrypt messages sent to you, we need to have your digital signature.
Send InterFAX Your Public Key ‘Signature’
This step only needs to be done once. Send a signed (not encrypted) email message to digitalid@interfax.net from the email address from which you intend to send your faxes. InterFAX will automatically associate the sender address with this digital signature. (Note that this will encrypt inbound fax messages, if inbound service is active. For more see comment below*).
Any confirmations which are returned to this address will from now on be encrypted. To cancel encryption, send an unsigned email message to digitalid@interfax.net.
* Note: This is also the way to request that inbound faxes be forwarded to you in encrypted form. If you do NOT wish to activate inbound fax message encryption, complete the instructions above, then login to your account, click Preferences -> Incoming, then click “Security Settings” next to the appropriate email address. The deselect “Sign Messages” and “Encrypt Messages”.
Related Articles
Encrypt outbound messages sent through the InterFAX email-to-fax service
Encrypt inbound fax messages received through the InterFAX fax-to-email service
Enabling Encryption for Inbound Faxes
InterFAX is an enterprise-grade fax-to-email service, providing secure faxing with strong encryption, SSL access and HIPAA compliance. For an introduction to InterFAX’s encryption features, see our encrypted fax solutions.
This page explains how to enable encryption for inbound faxes. See also our documentation on encryption for outbound faxes and enabling encryption for fax confirmation.
Enabling Encryption for Inbound Fax Messages
The security of messages received through InterFAX may be enhanced by having emails, representing fax messages, sent to you in an encrypted format by the system. While this will NOT encrypt the fax transmission from your correspondent’s fax machine to our fax servers, it WILL secure the contents of the message while it is in transit from our servers to your computer.
(Developers please note: When receiving faxes through the InterFAX XML Web Service, you may use SSL to access our servers securely at https://ws.interfax.net)
To encrypt fax messages, when they are sent to you as emails, we need to have your digital signature.
Send InterFAX your public key ‘signature’
This step only needs to be done once. Send a signed (not encrypted) email message to digitalid@interfax.net from the email address to which you receive your inbound. InterFAX will automatically associate your address with this digital signature. (Note that this will also encrypt outbound fax confirmations returned to you, if outbound fax service is active.)
Any faxes forwarded to you at this address from now on will be encrypted. To cancel encryption, send an unsigned email message to digitalid@interfax.net.
Related Articles
Encrypt outbound messages sent through the InterFAX email-to-fax service
Receive encrypted confirmations of sent faxes
Enabling Encryption for Outbound Faxes
InterFAX is a secure email-to-fax service, supporting TLS access, strong encryption and HIPAA compliance. For an introduction to InterFAX’s encryption features, see our encrypted fax solutions.
This page explains how to enable encryption for outbound faxes. See also our documentation on enabling encryption for inbound fax messages and encryption for fax confirmations.
Enabling Encryption for Outbound Fax Messages
The security of messages sent through the InterFAX system may be enhanced by encrypting your emails. While this will NOT encrypt the fax transmission from our servers to the fax machine itself, it WILL secure the contents of your message while it is in transit from your computer to our servers.
(Developers please note: When faxing through the InterFAX XML Web Service, you may use TLS to access our servers securely at https://ws.interfax.net)
There are two steps to encrypting fax messages sent to InterFAX:
- 1. Obtaining the InterFAX public key signature, and
- 2. Encrypting your messages.
Obtain the InterFAX public key ‘signature’
This step only needs to be done once, or whenever your keys are renewed.
- 1. Login to your account, then select Preferences -> Outgoing. Under the ‘Authentication and Feedback’ section find the paragraph titled ‘Encrypting emails to InterFAX’. Click the ‘Click Here’ link.
- 2. A popup screen will allow you to feed in the email address(es) to which a digitally signed email will be sent. You may enter multiple, comma-separated addresses.
- 3. You will receive a signed email from InterFAX. Add the sender to your address book (e.g., in Outlook Express, right-click the sender name and select ‘Add to Address Book’). Verify that the address book entry includes a digital ID.
Note that this process needs to be performed only once, if you retain the InterFAX digital ID in your address book.
Encrypt Your Message
When sending emails to be converted to faxes:
- 1. Address the message to the newly-created address book entry, send@fax.tc (and not to the usual faxnumber@fax.tc).
- 2. In your email’s subject line add /fax=faxnumber, where faxnumber is the destination number, as usual (e.g. This is a test message /fax=+12125551212). Multiple recipients may be entered by separating them with semicolons (;), like this: /fax=faxnumber1;faxnumber2;faxnumber3
- 3. Click the “Encrypt” button on your email program to send the message encrypted.
If you wish to obtain a security certificate to sign your emails, you can obtain one at the Thawte web site for free.
Encrypt Your Message Even Further
The solution above leaves the destination fax number “in the clear”. You may wish to further encrypt your message and hide the destination fax number. Here’s how to do it.
In the subject line add /fax=body, using the literal term “body” instead of the fax number indicated in the preceding section. Then, enter !*faxnumber*! (exclamation mark, star, destination fax number, star exclamation mark) anywhere in the email’s body.
For multiple recipient addresses separate the numbers with semicolons (;), like this: !*faxnumber1*!;!*faxnumber2*!;!*faxnumber3*!.
To broadcast the fax to a list of recipients managed through InterFAX’s online list management screens, enter !*list=listname*! (exclamation mark, star, the word “list”, equals sign, name of the list you wish to fax to, star, exclamation mark).
Related Articles
Receive encrypted confirmations of sent faxes
Fax encryption – secure inbound fax messages with InterFAX fax to email service